<img height="1" width="1" style="display:none" src="https://www.facebook.com/tr?id=252463768261371&amp;ev=PageView&amp;noscript=1">
User Guide for Creators

Introduction

Backstage-Starnow-Logo

Backstage’s Casting + Hiring System also powers the tools on StarNow. All of the following instructions apply to both Backstage + StarNow. However, some of the specific links below will bring you to the Backstage version of the tools; navigate to the equivalent areas of StarNow to access that site's respective tools.

Backstage's Casting + Hiring System includes a Casting Dashboard, Application Manager, and Messaging Center that offer state-of-the-art features, such as enhanced applicant filtering, bulk actions, collaboration tools, and professional-grade organizational options to help you manage the casting process faster and more efficiently than ever before.


Watch the video above for a quick one-minute overview of how we can help you cast your projects. And check out our Celebrity Testimonials page to learn about some of the world-famous actors and directors that got their start with us. And see below for advanced guidance, tips, and tricks.

Also visit our Help Center for more detailed instructions on how to use specific features of the site.

Casting Dashboard

The Casting Dashboard is your starting place to manage your projects on our platform.

Use the Casting Dashboard to view a list of your active, draft, and expired productions; edit production details; and navigate to the Application Manager for each production. Dashboard options include:

  • To create a new production, click the “Create New Production” button to post a casting notice.
  • You can return to this Dashboard at any time by clicking the dashboard icon displayed in the upper right hand corner of your screen.
  • Click the edit icon next to your productions to edit your project details, add and remove roles, add script sides, expire or extend your listing's run, etc. Quickly jump to applicants you’ve recently reviewed by clicking on the applicants in “Recently Viewed Applications.”
  • Keep track of recent notes you've left on applicants' submissions.
  • Add and manage collaborators, so your colleagues can help you cast your project.

2023-07-10 14_25_32-Casting Dashboard


Selecting a Production

Mouse over the “My Productions” box to scroll through a list of your productions. Click a production's title to see additional information, including how many new applicants you have lined up for every role.

From here, you can quickly go to the project's full Application Manager, edit/update the job listing, view the published version of the listing, or expand the item for more details.

casting-dashboard-icons


Your Casting Dashboard & Application Manager — 9 Tips for Success:

    1. From within your Casting Dashboard, you can choose exactly which production you'd like to see applications for.
      2023-07-10 14_41_51-Casting Dashboard

    2. After clicking the "Application Manager" option next to a production, you can view all applicants at once, or quickly filter the results by role. This lets you easily focus on casting specific roles.
      2023-07-10 17_17_17-Applicant Manager

    3. Using the filters at the top of the page, you can also quickly drill down the list of applicants by profile type, gender, age range, union status, location, ethnicity, keywords, media assets, and more. (Example: You can instantly filter out applicants who don't have a video reel available, and/or filter out applicants that are located in the wrong state.)
    4. Or click the "Clear" option to clear the filters and see all of the actors that have applied.
    5. You can organize applicants into Workflow Folders and Shortlists and apply additional filtering and sorting options to quickly browse through the talent. Click on their names or headshots to view additional details, contact info, photos, videos, audio clips, and more.
    6. The special Grid, List, Video, Audio, and Schedule Views provide you with customized and immediate access to applicants and their submission materials, including any photos, video reels, audio samples, or cover letters they included with their applications.

      2023-07-10 14_53_12-Applicant Manager

      2023-07-10 16_37_45-Applicant Manager

      2023-07-10 16_39_27-Applicant Manager

      2023-07-11 11_46_01-Applicant Manager
    7. When you filter to a specific Role, a new tab called "Suggestions" will also appear. Click on this option and the Suggestions Engine will automatically search through the site's Talent Database of hundreds of thousands of actors, models, and performers — based on your role criteria and any additional filters you apply — and instantly deliver smart suggestions for you to consider adding to your project.
    8. To contact an actor, simply click on the dialogue icon under their headshot, or click on their name to expand their application and then choose the "Message" option at the top of the application. Or you can select multiple applicants and use the Actions menu to contact all of your selections at once, in bulk.
    9. You can also add private notes to applicants' submissions. These notes can only be viewed by you and your collaborators, so you can keep track of your thoughts about the talent while you're reviewing their submissions, during the auditioning process, and even after they've been cast.

Application Manager

The Application Manager is your tool to review applicants and cast your project.

With the Application Manager, you can review candidates on a role by role basis, organize candidates in folders, and filter candidates by union status, age range, location, and more.


Switching Between Roles

The Application Manager gives you the ability to cast by role. View applicants by the role to which they’ve applied.

To switch between roles, select the roles dropdown here:

1-Jul-11-2023-04-22-45-1871-PM

You will see each of your project’s roles listed, as well as an “All Roles” option. Select between roles to view applicants who applied to a specific role.

Applicants

Within your production you will see a list of Applicants in the “Unfiled” folder, with the applicant’s headshot, name, location, and other key data.

You can switch between the Grid View, List View, Video View, Audio View, and Schedule View options in your project's Application Manager to customize your experience.

List View example:

2023-07-11 12_26_21-

To quickly move an applicant to the “Yes” or “No” folders, click either the thumbs up or thumbs down icon.


Grid View example:

By hovering your mouse over an applicant, you can view the roles they’ve applied to in the sidebar:

2023-07-11 12_31_24-Applicant Manager

You can also click on the role name in the sidebar to reveal the requirements. Now when you hover over an applicant you can see how well they match the role.

2-Jul-11-2023-04-36-30-5577-PM

To view more information on a specific applicant, click either the applicant’s name or headshot. This will open up the applicant’s detailed view:

2023-07-11 12_45_29-Reports dashboard

In the applicant’s detailed view, you can review additional headshots, video reels and audio submissions, view the candidate’s cover letter, and click to view the candidate’s resume, full profile, and credits.

You can also "Move" candidates to the Unscheduled or Hire folders, put them in the “Yes” or “No” folders, "Message," or “Request Audition” by clicking the appropriate buttons:


2023-07-11 12_49_19-Applicant Manager

To view the roles an applicant applied to, click the “Roles & Auditions” button at the top of the applicant detail view:

2023-07-11 12_51_13-Applicant Manager 

You can add the candidate to a different role, or move the candidate to the “Yes” or “No” folder of a specific role, or remove them from a current role to which they’ve applied. 

Filtering Applicants

To narrow down your list of applicants, you can use the Application Manager’s filter options located at the top of the application manager.

The filtering options can work when "All Roles" is selected, or for a particular role.

2023-07-11 12_54_18-Applicant Manager

You can filter applicants by name, or filter by gender, age range, union status, location, and more. The Keywords filter can be used to search for languages, accents, etc.

Click “Search” to initiate your search. Click “Clear” to remove your filters and reset your search.

You can also filter applicants by whether they’re new, contacted, or suggested by using the filter dropdown here:

3-Jul-11-2023-05-48-39-2604-PM


Suggestions

Suggestions is a feature that recommends candidates from our Talent Database who match some of the key criteria you've associated with your roles.

You can view Suggestions by selecting a specific Role in your project's Application Manager. The "Suggestions" folder will then appear and can be clicked on.

(Note: Suggestions are not available when "All Roles" is selected; you must first select a particular Role that you'd like Suggestions for.)

You can then view Suggestions, and further filter down on the results to surface the most applicable candidates.

4-Jul-11-2023-09-51-00-1232-PM

Please note: the actors in the Suggestions folder have not applied to your project. If you want them to consider participating in your project, you will need to send them an Invitation to Apply, or a message indicating your interest.

Alternately, you can use the "Add to Role" option to add them into your project's workflow without immediately letting them know that you're considering them.

2023-07-11 17_57_16-Applicant Manager
 

Once added to a role, they will appear in your “Submissions: Unfiled” folder, marked with a "B" icon to indicate they're a "Backstage Suggestion" rather than a regular applicant.

You can also use the "Show" menu to choose to only see your regular applicants (choose "Show: Not Suggested") or only the suggested applicants that you've added to your project ("Show: Suggested").
5-Jul-11-2023-10-15-58-7044-PM

Just keep in mind that at this point the actor still doesn't know you're considering them, since they didn't apply. So if you decide to contact them later you'll need to explain what your project is, and ask them if they're interested in participating. The easiest way to do this is to click the "Invite to Apply" button on their candidate card:

2023-07-11 18_17_35-Applicant Manager

That will let you send them a formal invitation to apply with just a couple of quick clicks, and the invite will be automatically linked to your job-listing/casting-call so the talent will be able to easily see what your project is about, so they can decide if they're interested.

If they are interested, then you'll get a proper application from them.

Alternately, you can send the talent an Audition Request, which will also automatically generate an Invitation to Apply, in addition to allowing you to offer more specific audition-request details.


Bulk Actions

You can select multiple applicants in either the grid view or list view by selecting the check box next to their profile:

6-Jul-12-2023-05-35-19-5634-PM

You can also use select the “Select All” checkbox to select all applicants on a particular page or folder.

Click the “Actions” button to view a drop down menu. You can then select a bulk action that will affect all selected applicants:

7-Jul-12-2023-05-37-40-3003-PM


Folders

As part of your process for organizing applicants to your project, you can move candidates to various folders (aka "buckets" or "tabs").

The Application Manager supports six primary folders: Submissions, Auditions, Callbacks, Hire, Invited, and Archived.

A seventh folder, "All Folders," will also appear when you're viewing your Shortlists (providing a view of all of your shortlisted applicants/"selects" from across all of the other folders). And an eighth folder, "Suggestions," will also appear once you've drilled down to a specific role (the Suggestions folder provides a randomized selection of additional candidates from the platform's Talent Database that you might want to invite to apply to the role).

Plus, each folder has its own unique set of sub-folders.

2023-07-12 13_47_10-Applicant Manager
 

Submissions: Unfiled” is where all applicants start out by default when they first apply. From this sub-folder, you can move applicants to other folders.

If, for example, there are applicants who do not qualify for your project, you can move them to the Archive folder by marking them as a “No.” You can place your favorite applicants in the "Yes" sub-folder. From there, if there are applicants you intend to audition, you can move them to the “Auditions” folder. Need to audition the same candidates a second time? Progress them on to the "Callbacks" folder. Ready to hire them? Add them to your "Hire" folder.

Folders are role-specific; If, for example, a candidate has applied to more than one role, you can move them to the “Yes” folder for one role, and the “No” folder for a different role.

(However, if you are in the “All Roles” applicant view, and you move a candidate who has applied to multiple roles, the candidate will be moved to the folder you specified for all roles to which they’ve applied. To move an applicant on a per-role basis, simply filter down to a specific role first.)

You can click on any of the folders at any time to see the applicants within that folder.

You may switch between the default Grid View and the other convenient layout options, such as List View, Video View, Audio View, and Schedule View.

Audition Requests

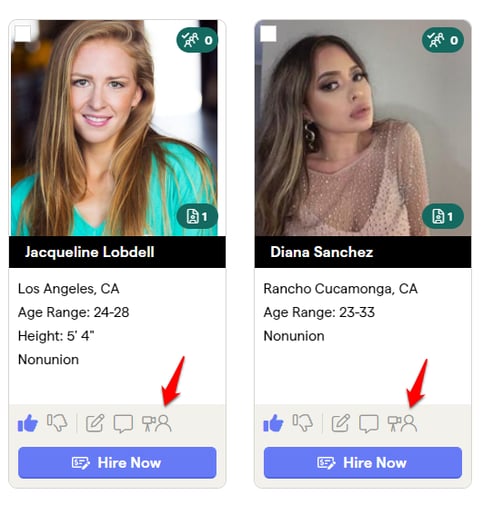
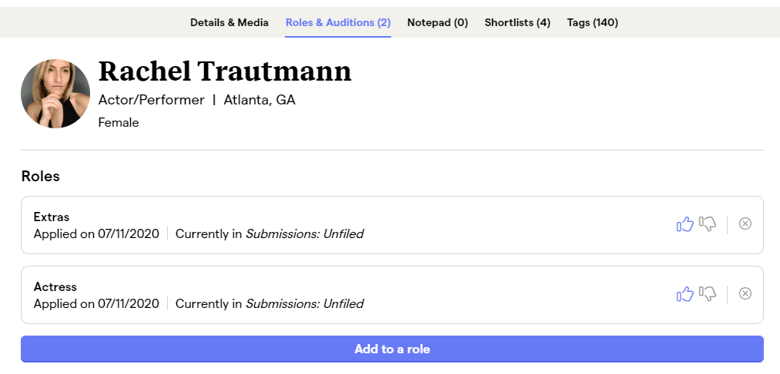
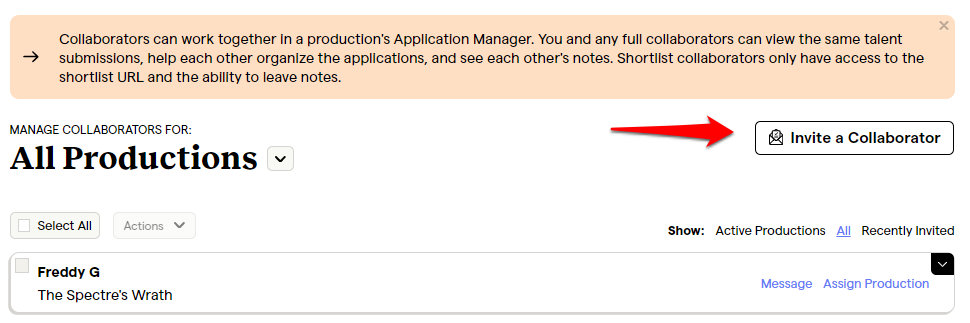
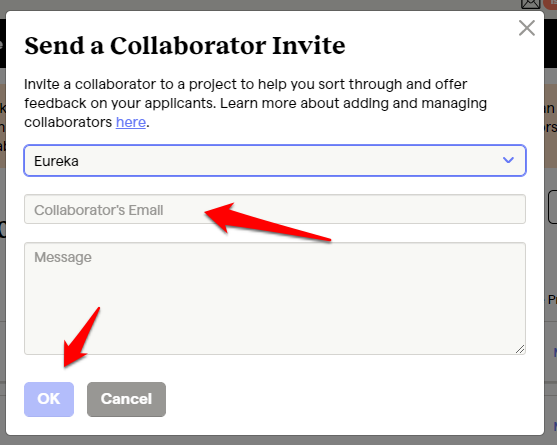
You can request a self-taped audition, live in-person audition, or live virtual audition from talent on a per-applicant basis, by clicking on the Request Audition button on their application.

  • Self-Tape Auditions: Send talent the script sides you'd like them to read. They'll then make an audio or video recording (your choice!) of their performance, which will be delivered to you in your Application Manager.

  • In-Person Auditions: Create an audition schedule, choosing exactly when and where you'd like to hold auditions and how many actors you'd like to see per slot/time-period. Move the applicants you'd like to audition into your Auditions: Unscheduled folder, and then use our scheduling system to automatically fill them into your available time-slots, or manually control the process by dragging and dropping the candidates into the slots and order you'd like to see them in. Then send out audition applications to all of your selected talent with a couple of clicks. The platform's scheduling system will then let you know which candidates have confirmed that they'll attend, which have declined, and which have requested to reschedule for a different time.

  • Virtual Auditions: Access all of the same powerful tools available in the In-Person Auditions system, but without needing to hold auditions at a physical location. Instead, you can audition talent via a live video conference. You can also invite collaborators to participate in the virtual audition room with you as well. A recording of the audition will be automatically generated for you (and become available for download or playback on the site) within approximately one hour after the audition ends.

After an initial round of auditions, you can also move your favorite candidates on to a Callback phase. Callbacks (aka, second-round auditions) can also take the form of self-tapes, in-person meetings, and virtual auditions.

The following video provides a detailed walkthrough of our audition tools:


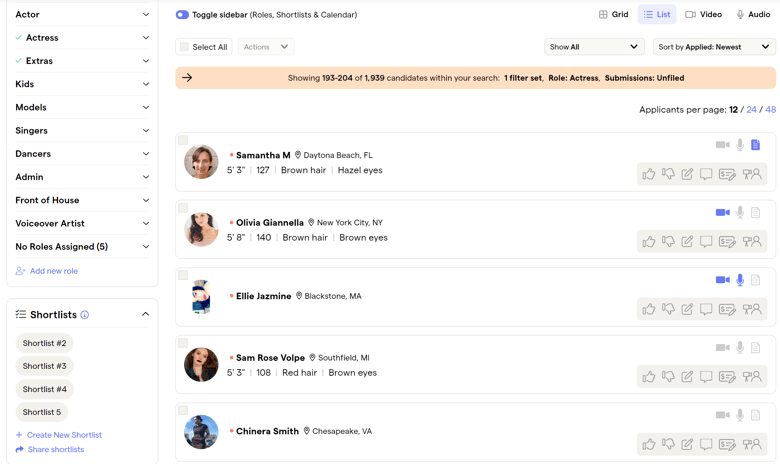
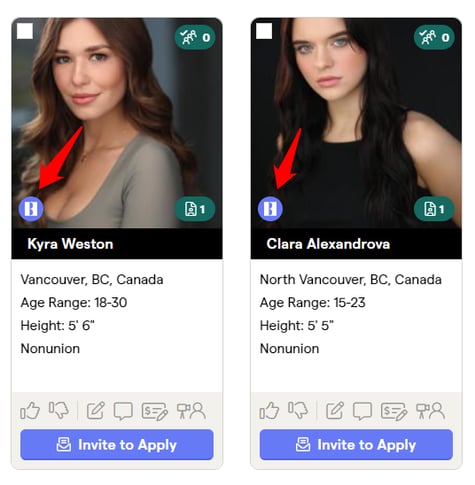
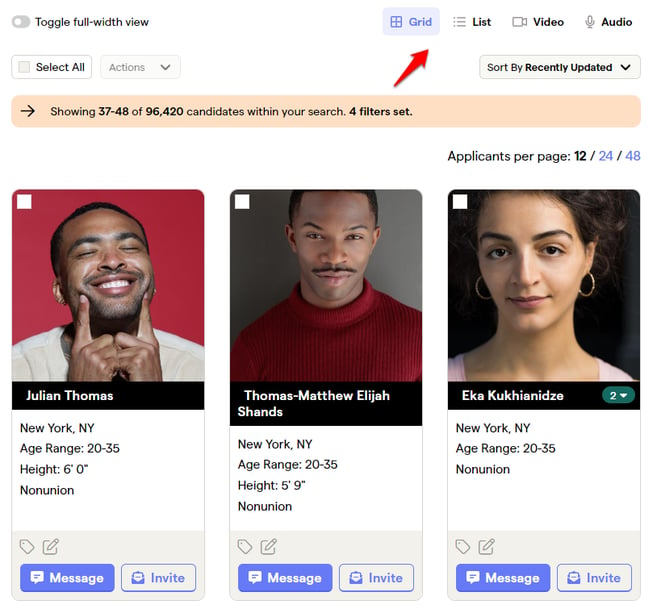
Get started by clicking on the audition request button on any application:

8-Jul-12-2023-06-10-28-6217-PM

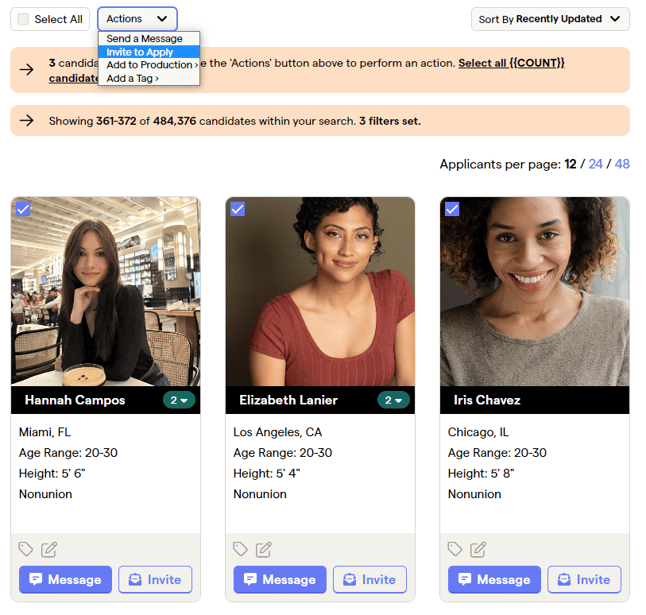
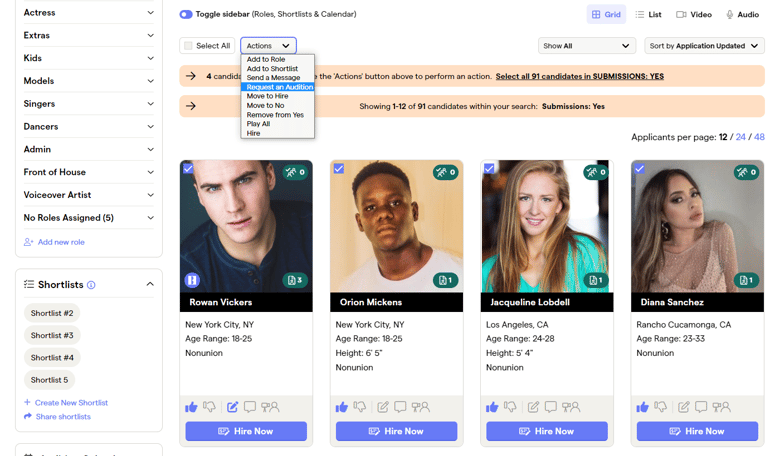
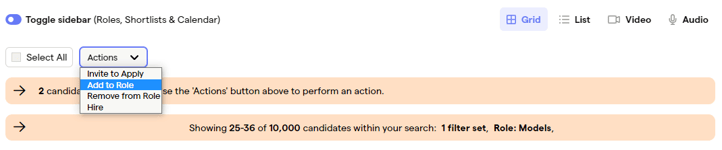
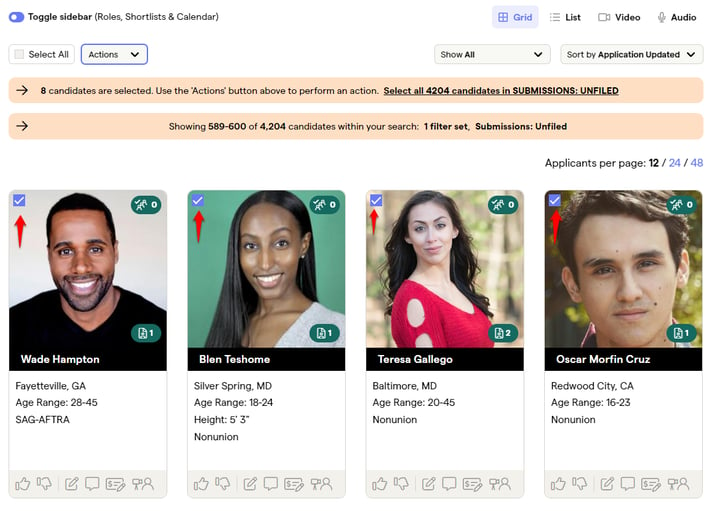
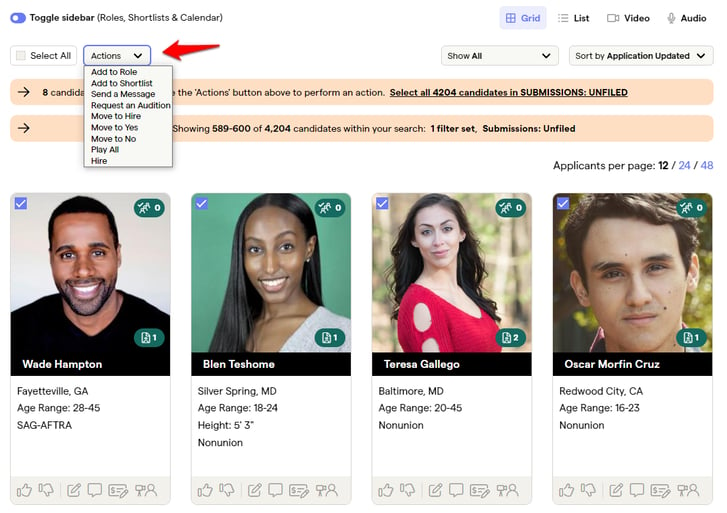
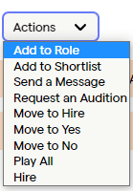
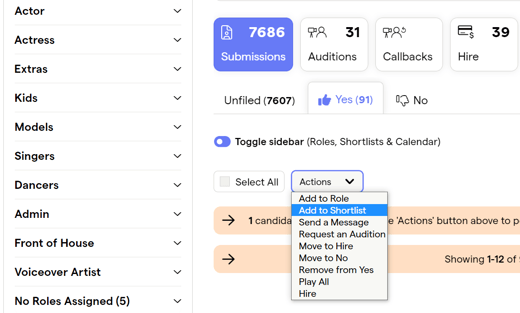
Or you can send requests in bulk, by selecting some or all applicants and then using the "Actions -> Request an Audition" option:

 2023-07-12 14_12_26-Applicant Manager

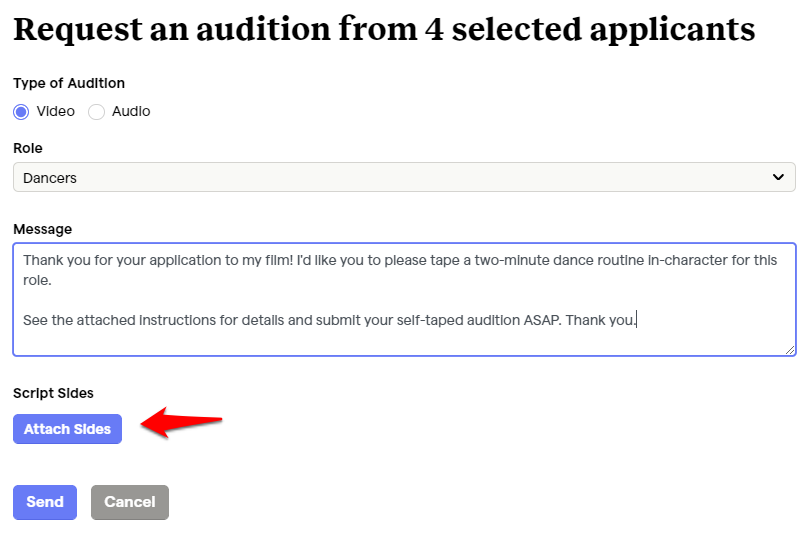
With self-tapes, you can specifically request that the talent submit a Video or Audio audition. And you can attach notes and script sides to your requests. Like this:

 12


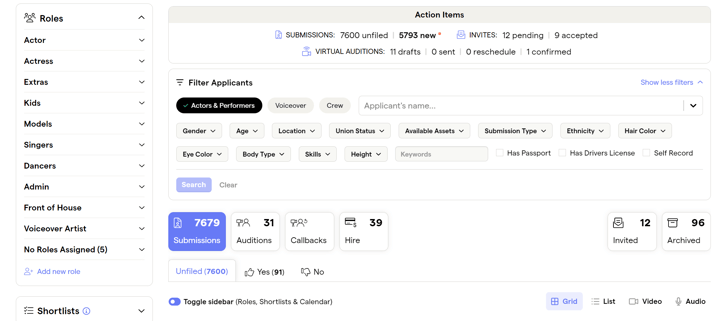
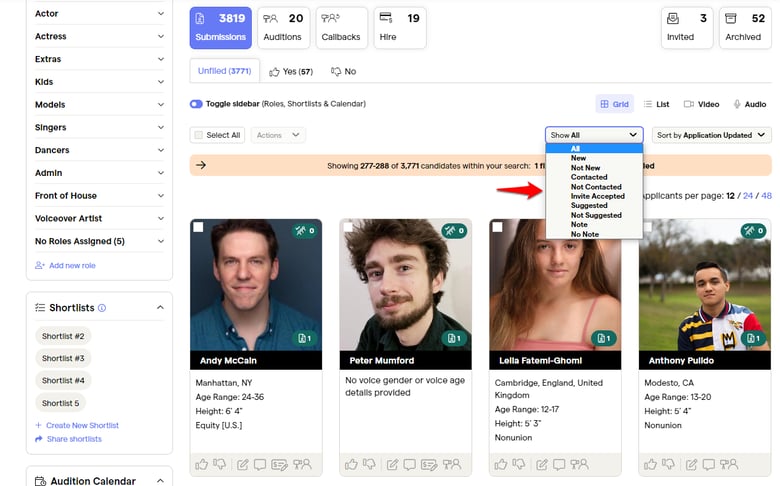
After an applicant has been sent an audition request, their application will be automatically moved to your project's Auditions folder. There, you'll find additional sub-folders that will allow you to track the progress of your audition requests:

2023-07-12 14_33_12-Applicant Manager

The Audition sub-folders include:

  • All Audition: All of the applicants that you've placed in your Auditions folder.
  • Unscheduled: Applicants that you've moved to your Auditions folder but you haven't sent an audition request to yet.
  • Self-Tape: Applicants you've sent a self-tape audition request to. (They'll automatically get moved to the Self-Tape: Received folder once they've responded to your request by sending you a self-taped audition.)
  • In-Person: Applicants that you've placed in your Audition Schedule for a live in-person audition at a specific physical location. 
  • Virtual: Applicants that you've placed in your Audition Schedule for a live virtual-audition video-conference
  • Yes: Your favorite applicants that you've auditioned.
  • No: Auditioned applicants that you're removing from consideration for the time being; these candidates can also be found in your Archived folder.

Additional folders within the sub-folders also automatically organize things into more granular segments for you, such as which candidates have confirmed that they'll be able to attend your auditions or not.

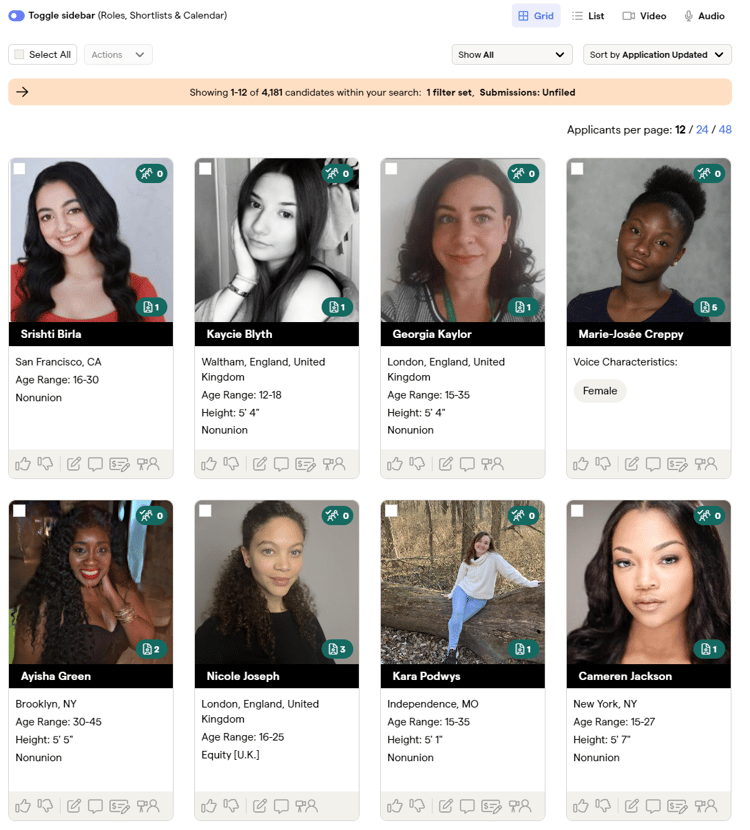
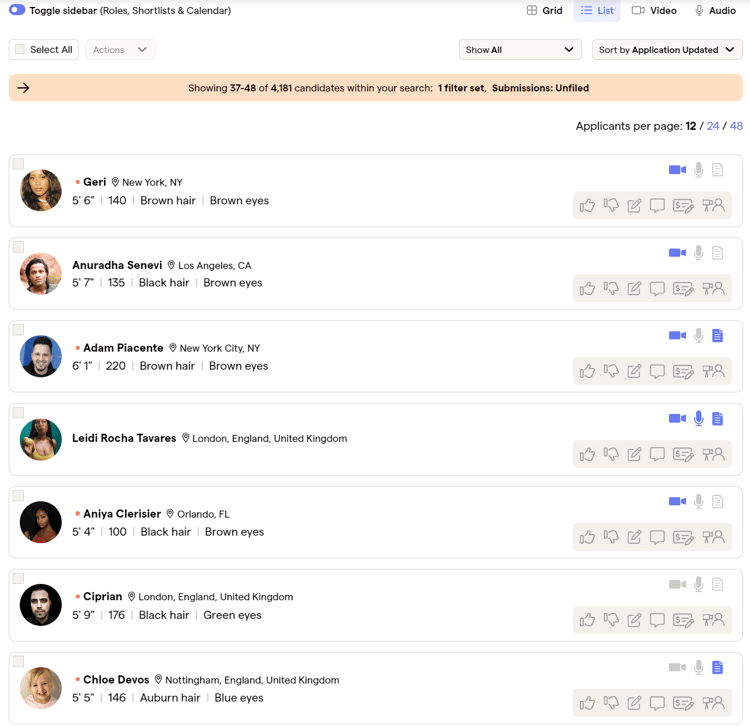
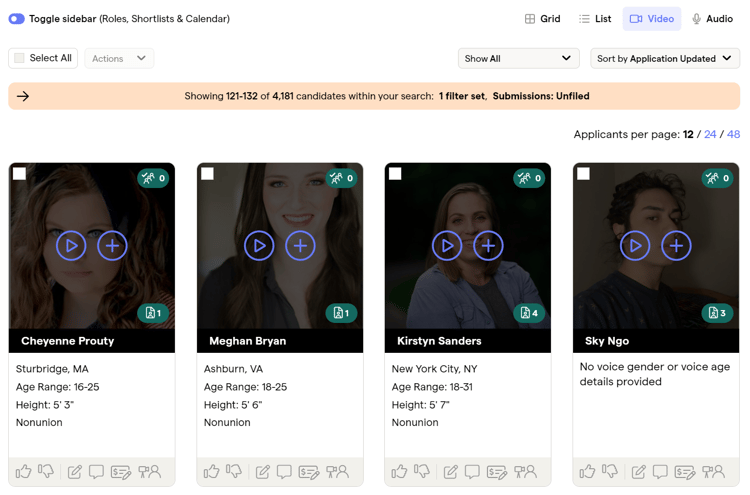
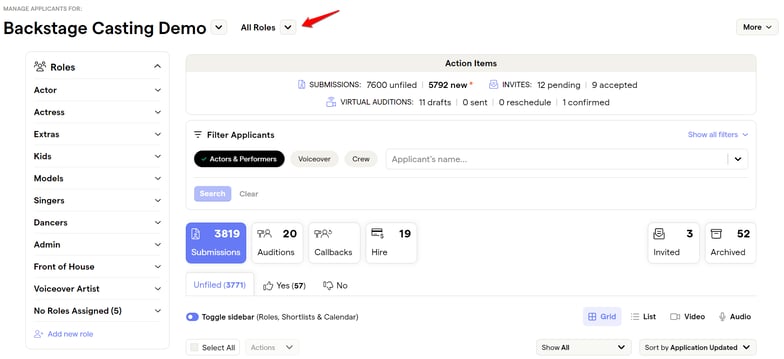
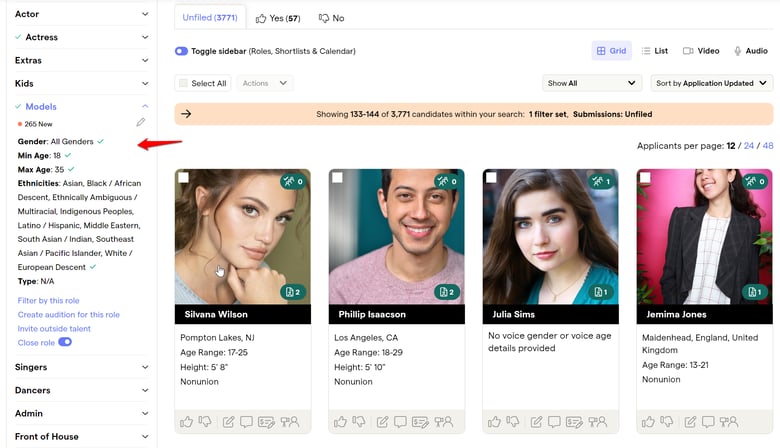
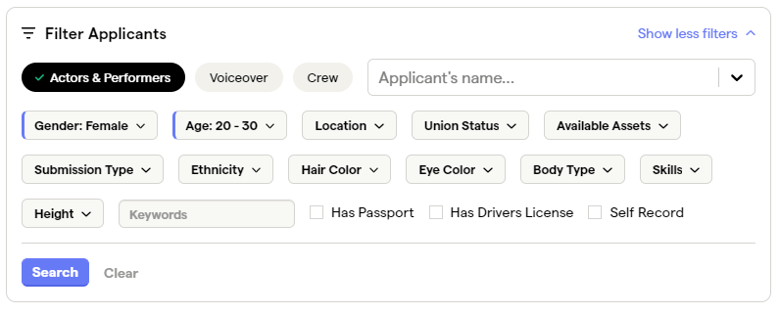
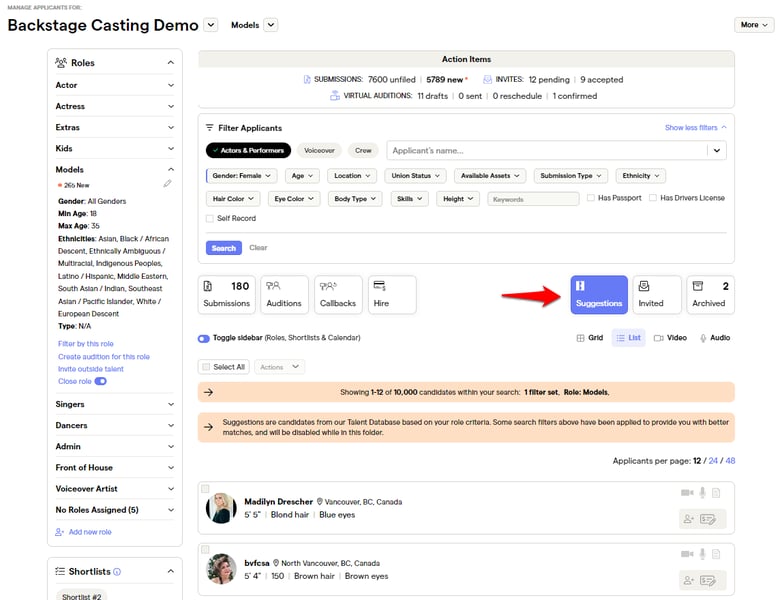
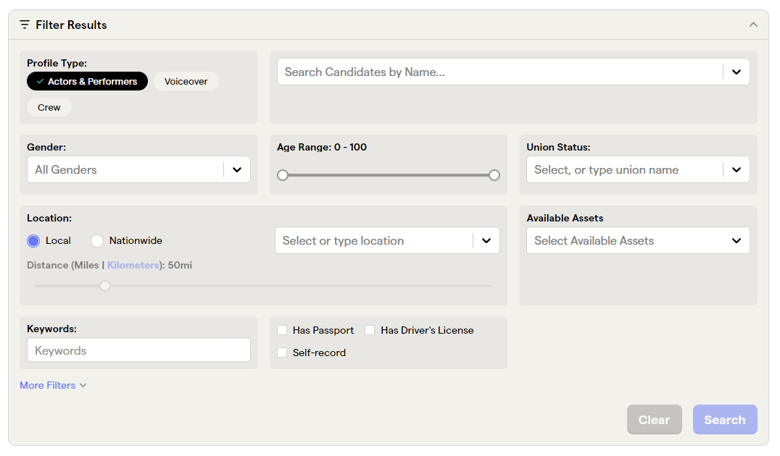
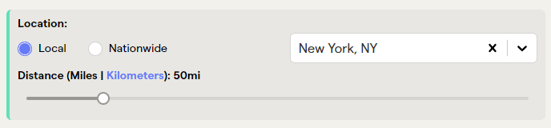
You can also further filter down and sort the results in your Auditions folder using any of the other Application Manager options (such as filtering by role, gender, location, etc.).

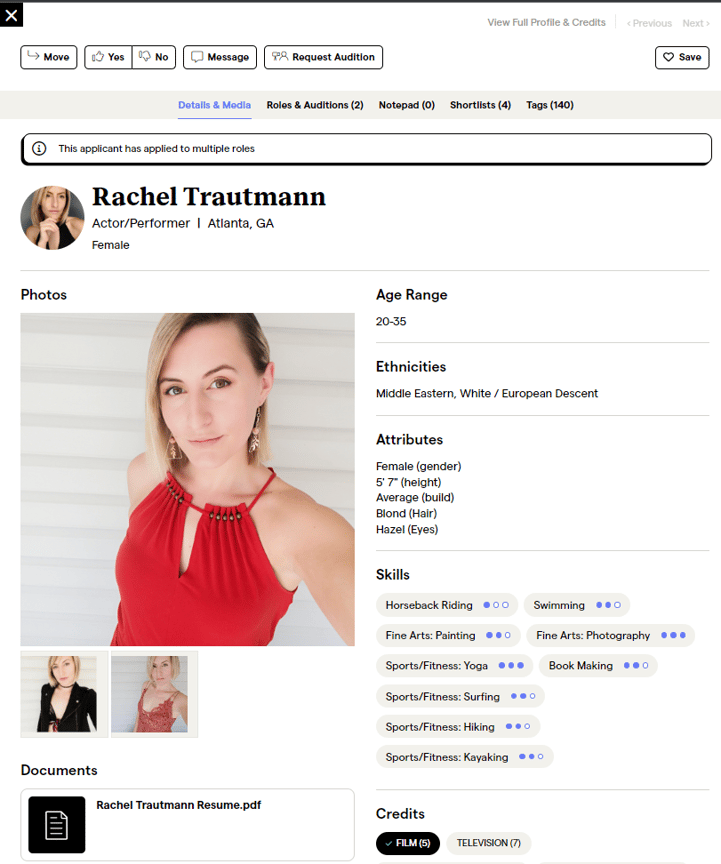
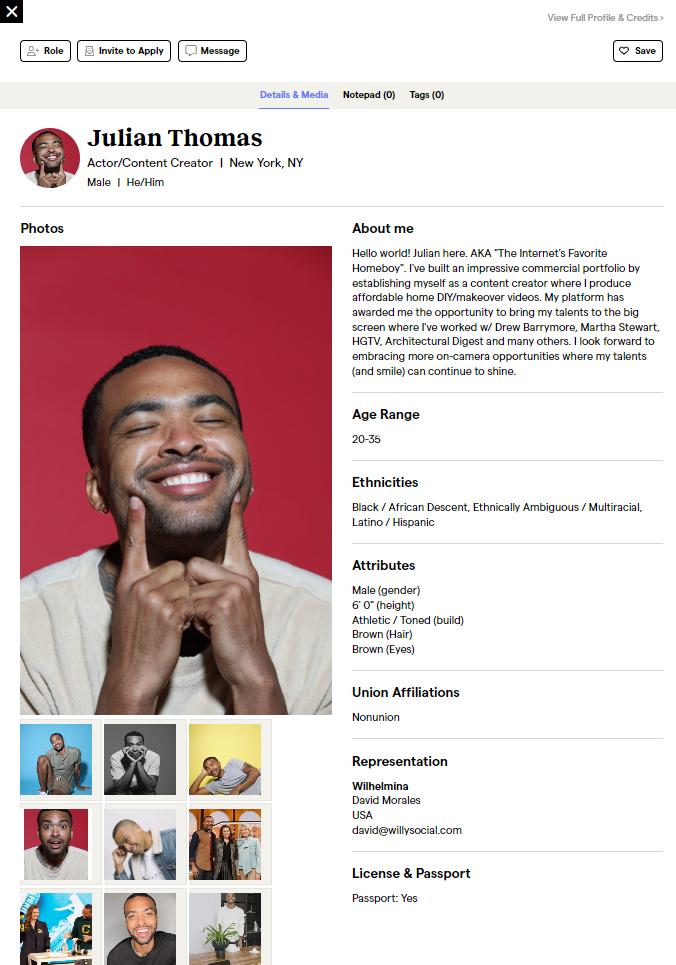
Once you've received a self-tape audition, simply click on the applicant to view their audition video or audio submission.

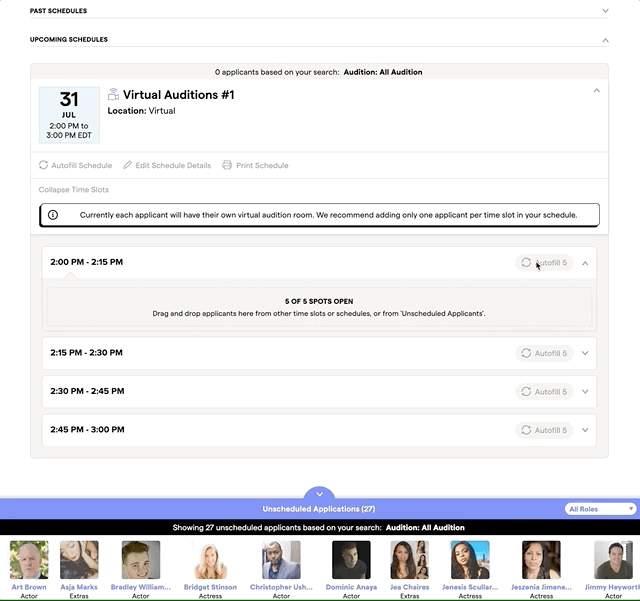
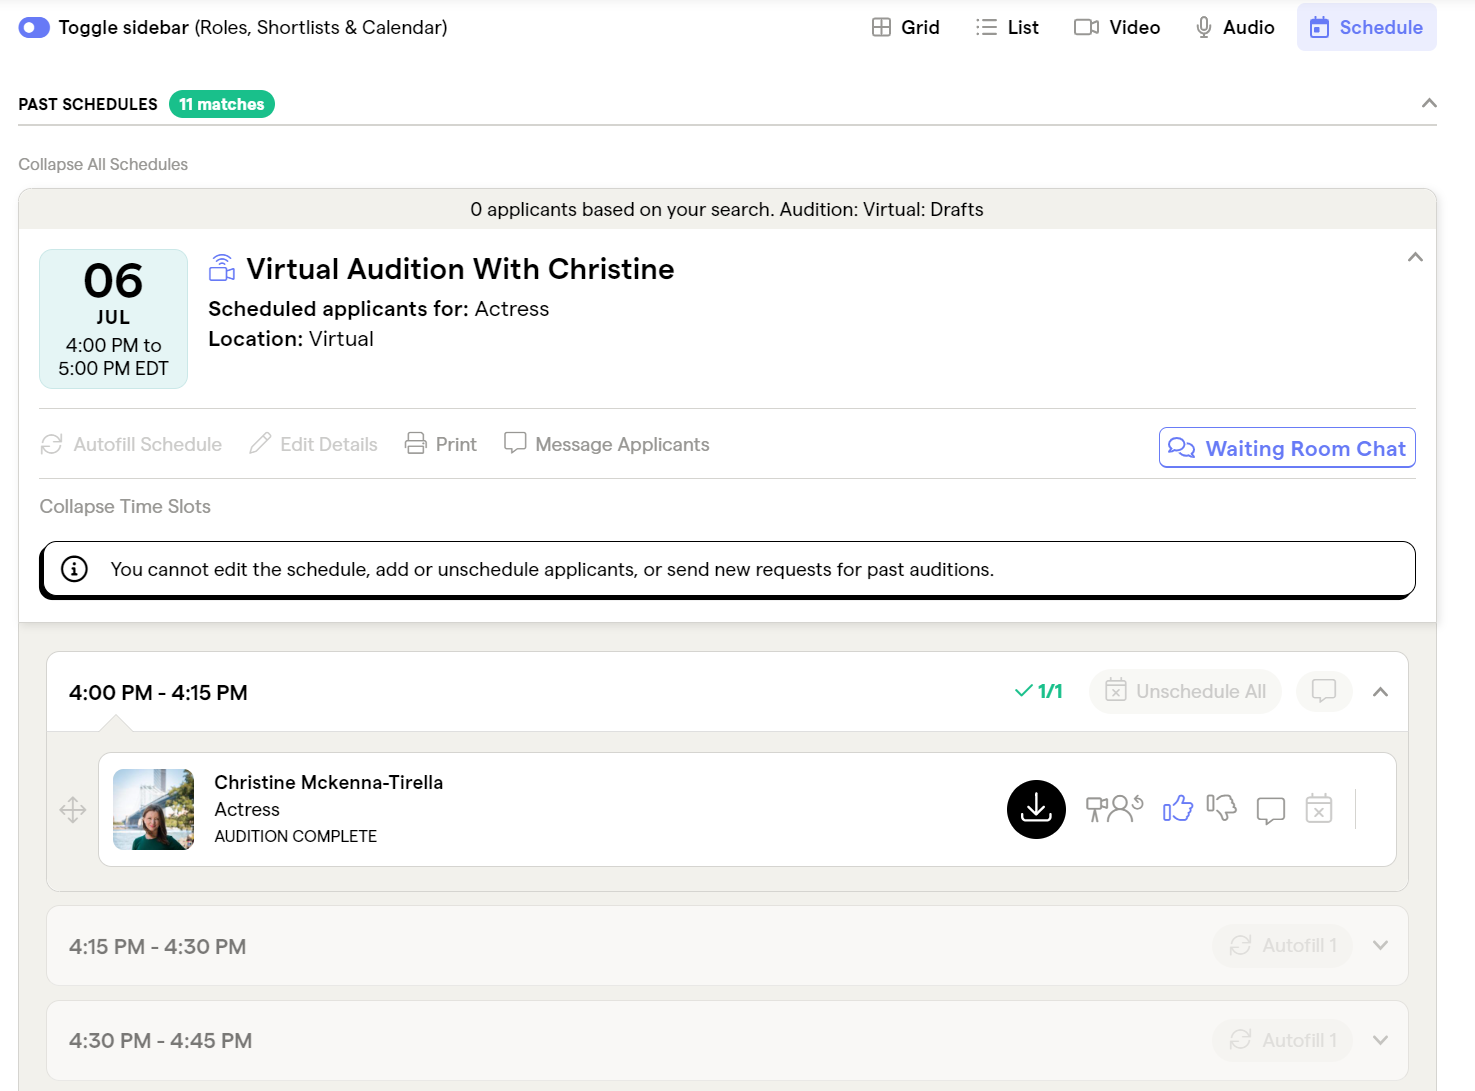
For live in-person and virtual auditions, switch from the default Grid View to the special Schedule View for a cleaner overview of your schedule, access to your virtual-audition conference rooms, and advanced scheduling options:

2023-07-12 14_39_28-Applicant Manager

Note: Applicants are automatically notified when you send them an audition request or a direct message. However, any decisions you make to mark an application as a Yes, No, Archived, or Hire will not trigger any alerts to the applicants; your decisions are private, as are your notes.


Setting Up a Schedule:

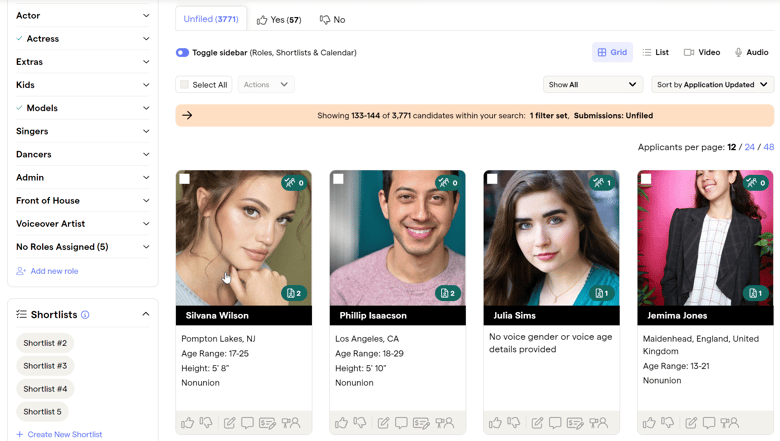
Once applicants have applied to your job or casting call, you can quickly choose your favorites to audition. This can take the form of a self-tape audition request or a live (virtual or in-person) audition.

Audition schedules can be created on-the-fly as you choose applicants to audition, or you can set up schedules ahead of time.

For live auditions, the easiest thing to do is to first create your schedule. Then bulk-move your favorite candidates to your "Auditions: Unscheduled" folder. From there, you can use automation options to quickly populate your schedule. And/or you can easily drag-and-drop candidates into specific audition time slots:


Virtual-Audition-Schedule


Advanced Features Include:
  • Flexible scheduling options let you set exactly how many performers you'd like to audition within any span of time.
  • Time slots are automatically generated for you based on the criteria you enter.
  • Schedule in planned breaks, shift around schedules, and reorder applicants as needed.
  • Keep track of confirmations and reschedule requests.
  • Optionally allow talent to reschedule themselves if you have open time slots available.
  • Second-round callback auditions.
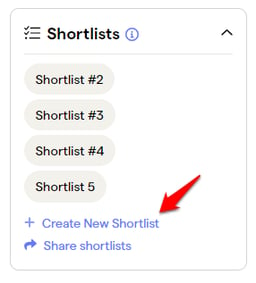
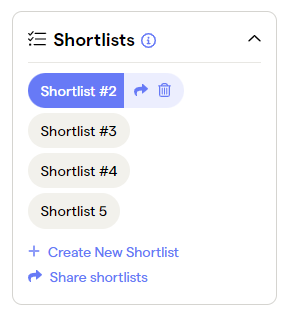
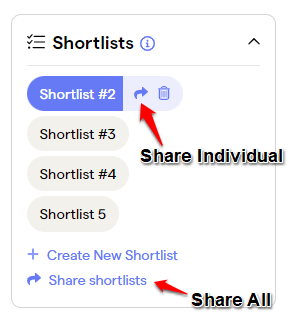
  • Add your favorite auditionees to shortlists to share with your clients and colleagues.


Hire & Pay Via Our Platform

Once you've the chosen the talent you'd like to hire or cast, click on the Hire button on their application.

From there, you can easily send a secure payment to the talent for work completed or order an asset from them that they will be compensated for after delivery.

Once the workflow has begun, your Payments Dashboard can be used to manage the process. There you can send payment and communicate with the talent regarding payment and services.

If you use the platform's secure payments system, you'll be able to conveniently pay talent directly through the site. 

For more in depth info about this useful offering please click here for details.

Notes

If you would like to leave specific feedback about a particular applicant, you can do so with Notes.

Notes can not be seen by the applicants. These are private notes that can only be seen by you and your selected Collaborators (the other people involved in your production that are involved in helping you make casting decisions).

For instance, you might leave a note about what you liked or didn't like about an applicant, simply as a future reference point for yourself. Or if you're working with a collaborator, then you could use notes to share feedback with each other about what you think about the applicants and their auditions.

To leave a note on an application, go to the applicant’s Details View in the Application Manager and click on Notepad. You will then see the following note field:

9-Jul-12-2023-06-49-37-9201-PM

You can drag to expand the Note field by clicking on the bottom right corner of the notes box and dragging down with your mouse.

Notes can be applied to a specific role, or no role, and you may leave more than one note per applicant.

Adding & Updating Roles

In a production's Application Manager you can click the "More" button and then select "Add a new role" from the dropdown options to easily add additional roles to your project's character breakdown. As long as your casting call is active (not expired), then the new role will become immediately available for talent to apply to. (To un-expire a casting call, simply visit your Dashboard, click "edit" next to your project, and then change the casting call's expiration date.)

10-4

You can also add actors to your production's new roles by choosing from among the people that applied to your project's other roles, actors you find in the Talent Database, and talent recommended by the Suggestions tab. Simply select the talent you'd like to consider for the new roles, and then choose the "Add to Role" option.

 2023-07-12 14_58_10-Applicant Manager

And if you click on a role in the Application Manager's sidebar, you can see more details about the role, along with additional options — including the ability to edit the role; filter applications based on what actors are associated with the role; and open or close the role.

To edit the role, click on the pencil icon below the role's name. This will open up the role-editing modal window, where you can quickly change a role's gender, age-range, character description, and more.

14

If a role has received zero applicants, you can also delete the role from your project via the editing modal by clicking on the trash-can icon that appears at the bottom-right of the editor. (For instance, if you added a role by mistake, you can delete it before any actors apply.)

2021-07-26 17_21_38-Applicant Manager

If a role has already received applicants, you can't delete it. However, if you've finished casting the role, you can turn the role off to stop any additional actors from applying. To do this, simply click on the "Close Role" option. This will remove the role from the public version of your casting call, so actors will no longer be able to view or apply to the role — while keeping the role's details and applicants archived in your Application Manager for your records.

2021-07-26 17_22_52-Applicant Manager

If you later decide that you'd like to continue receiving new applicants to the role after all, then just click on the "Open Role" option to open the role back up to new submissions.

2021-07-26 17_23_46-Applicant Manager


Messaging

Communicate with other users quickly, reliably, and securely with the Messaging System. Click here for details.

Collaborators

You can invite Collaborators to help you cast your project.

Your "Full Collaborators" are granted full access to your project's Application Manager and can view and organize applicants, send and receive messages, and add notes. You and your Collaborators can view each other's notes to communicate about the applicants.

From your Dashboard you can manage your Collaborators and invite new Collaborators to your project by first clicking the Collaborators link:

15


And then click the "Invite a Collaborator" button.

16-1

A popup modal will appear. Enter the email address of the person you'd like to invite to your project, and then select the production you want this particular Collaborator to work on. You can include a custom message as well:

17-1

Click "OK" and your Collaborator will receive an email invitation to join your project.

When you invite a Collaborator to your production, if they already have an account with us then your project will also be automatically added to their Dashboard. Or, if your Collaborator is new to the site, then they'll be sent a link that will let them sign up for a free account.

To remove a Collaborator from your project, go back to the Collaborators page. Click on the Collaborator you intend to remove, to expand their details, and then click the "Unassign" button next to the project you wish to remove them from:

18

"Full Collaborators" cannot invite or remove other Full Collaborators from your project, or remove other Collaborators' notes. (However, Full Collaborators can invite limited-access "Shortlist Collaborators" to your project on your behalf; Shortlist Collaborators will only be able to view the talent you've selected to include in a specific shortlists that you've shared with them.)

On the other hand, as the project owner, you can invite or remove as many Full Collaborators & Shortlist Collaborators as you'd like, and you can remove any Collaborator's notes. (Click the X button next to a note to delete the note.)

Project owners can also update the casting notices (aka job listings, casting calls, or breakdowns) associated with their productions: Add or remove roles; change the project description or categories; expire or reactivate a listing; etc. But other users cannot edit a casting notice they don't own.

If you're a Collaborator on a project but not the owner, then the collaboration icon will appear next to the production on your Dashboard:

19


Visit our Help Center for additional details about how to manage collaborators.

Shortlists

When running a job on our platform, your goal is to find the perfect applicants for your production.

Finding the right artist is often a collaborative process, and feedback from your production team and your clients is essential when it comes to deciding who to move through the casting workflow.

We made shortlists (also known as "applicant selects") to help you do exactly that, making it extremely easy for you and your team to select your favorite people for a role, leave some notes, and share your selects to a collaborator for their input.

Another way shortlists can be used is like a mood board.

First, create your shortlists

While setting up your job, you might find it useful to create some empty shortlists, making it easier to add applicants when you’re ready.

In your production’s Application Manager, in the sidebar at the left of the page, you’ll see the shortlist panel. Within it, you’ll see "Create New Shortlist" which you would click on to create a shortlist (see below).

11-Jul-12-2023-08-20-35-0984-PM

Another way to do this is when you’re reviewing applicants. You can select the profiles you like, and when you click the actions button the option to add them to a shortlist will appear. Then you can choose if you want to add them to an existing shortlist or create a new one to add them to.

 2023-07-12 17_08_27-Applicant Manager 

Managing applicants and leaving notes

With your shortlist created, you can keep adding or removing as many selected profiles as you like.

When you want to see all your selected artists in a shortlist, you can toggle a shortlist on or off by clicking on the name of the shortlist in the panel. All the profiles that belong in that shortlist will then appear in the results below.

Selected shortlists are highlighted in color, while unselected shortlists appear white. (See below) 

2023-07-12 17_10_43-Applicant Manager

To leave a note, select a shortlist and click the note icon at the bottom of their profile card. Or, if you prefer, you can open their profile and click the “Notepad” tab.

12-3

Sharing your shortlists

When you’re ready to share your shortlists, you can either share them separately, or in bulk.

When you click the share icon, you’ll be given the option to share it with either your existing collaborators or new collaborators. Shortlist collaborators are granted access to only the specific shortlists they’re invited to and can’t take any actions on the applications besides leaving notes. (However, using your Casting Dashboard, you can also optionally invite project-level collaborators to grant full access to your project’s entire Application Manager if needed.)

13-4


Check out our Help Center for more details and help with Using Shortlists.

Talent Database

The Talent Database helps you find and organize talent for your current and future projects.

You can search for performers using filters, such as age range, gender, location, and physical appearance; add performers to your production; or tag a performer, which will save their profile for later use.

Searching the Talent Database

The Talent Database has a series of search fields and filters you can use to quickly narrow down results. Then you can easily view the profiles you’re interested in:

2023-07-12 17_23_46-Talent Database_ Find Local Actors for Hire _ Backstage

You can search for performers using filters such as age range, gender, location, and physical appearance; add performers to your production; or tag a performer, which will save their profile for later use.

By name:

If you happen to know the name of the actor you’re interested in, you can search for talent by name in the search bar at the top of the filters box.

By Attribute:

If you’re looking for a certain type of actor you can filter by gender, age range, or profile type. By clicking on the “More Filters” option, you’ll have even more filters at your disposal, including ethnicity, body type, hair color, eye color, height range, and skills.

By Location:

To select candidates in a particular location, select the “Location” menu — this will present a search field where you can type in and select the location of candidates. Then adjust the “Distance (miles or kilometers)” to indicate how far outside of this area you’d like to see candidates.

For example, this selection is for actors within 50 miles of New York City:

2023-07-12 17_26_08-Talent Database_ Find Local Actors for Hire _ Backstage 

By Asset and Union Status:

You can select or type in one or more specific unions, all unions, or no unions from the “Union Status” dropdown: 

2023-07-12 17_36_24-Talent Database_ Find Local Actors for Hire _ Backstage

You can also filter your search by a candidate’s available assets. You can select to see results from performers with headshots, video reels, audio clips, or some combination thereof.

2023-07-12 17_38_31-Talent Database_ Find Local Actors for Hire _ Backstage

By Keyword:

You can use keywords to further refine your search. Use the Keywords search box in the filter bar to add a specific keyword.

Applying and Clearing Filters:

Once you‘ve selected your filter criteria, click the “Search” button at the bottom of the filter bar.

To reset your selections, click “Clear”:

14-2


Viewing Candidates

After applying your filters, you will see a list of candidates who best match your criteria.

You can switch between a grid view and a list view of candidates by selecting between these buttons:

15-1

To view more information on a specific candidate, click either the candidate’s name or headshot.

This will open up the candidate’s mini-profile details view:

2023-07-13 11_22_37-Talent Database_ Find Local Actors for Hire _ Backstage

In the candidate’s details view, you can review additional headshots, video reels, and audio clips; leave notes and tags; add the actor to a role; invite the actor to apply; contact the actor; and click to view the candidate’s resume, full profile, and credits.

Tagging Candidates

If you want to save candidates to review later, you can organize groups of candidates using tags.

With tags, you can choose how you’d like to organize your talent, creating a custom talent database of your very own.

To tag a candidate, you can click the tag icon in either the grid view or list view:

16-2

17-2

You can also create tags from the candidate’s details view:

18-1

You can then add multiple tags:

2023-07-13 11_41_31-Talent Database_ Find Local Actors for Hire _ Backstage


Viewing Your Tagged Candidates

You can view your tags on the main page of the Talent Database in a vertical menu bar on the left side of the page:

2023-07-13 11_43_17-Talent Database_ Find Local Actors for Hire _ Backstage

You can click on these tags at any time to see the candidates saved within them. You can also click on multiple tags to view all candidates stored in the tags.

In this example, we’re displaying all of the candidates we’ve tagged “Saved” and all candidates tagged “Dancer."

19-1

You can add and delete tags by clicking the “Manage Tags” button. A dialog will appear giving you the option to create a new tag, or to remove or rename existing tags.

Please note that if you remove a tag from the sidebar, then the tag will also be removed from all of the candidates you previously associated with that tag as well.

Tag View

You can quickly view what tags you’ve applied to every candidate by toggling the “Tag View.” Tag View is available by clicking the toggle at the top of the Tags sidebar:

20-1

When this Tag View is initiated, you can view the Tags associated with each actor:

 2023-07-13 11_50_54-Talent Database_ Find Local Actors for Hire _ Backstage


Folders

Folders are like Tags, except that candidates are added to Folders automatically when you take actions within the Application Manager (if you’ve posted a Casting Notice on the site) and when you take actions within the Talent Database.

Unlike tags (which you manually create and add candidates to), you cannot manually create or delete Folders; they’re all populated automatically. Folders include Contacted, Noted, Invited, Auditioned, and Hire; plus individual folders for every production you’ve created a casting notice for.

For instance, if you contact anyone on the platform, then you’ll be able to easily find them again by clicking on the Contacted folder. Or if you want to see every actor you’ve ever considered for an audition or ever marked as “Hire” in the Application Manager for any of your current or past productions, you can simply click on the “Auditioned” or “Hire” folders. Or if you want to see every actor that ever applied to one or more of your casting calls, then you can click on your production folders.

As an example: Perhaps you’ve run a dozen casting notices with us in the past, and you want to look through all of your past candidates at once. Simply click on all of the Talent Database production folders for your past casting calls, and the Talent Database will show you all of the actors from your selected projects.

You can then use the regular Talent Database search filters to quickly search through all of your past candidates; use Tags to create new lists featuring segments of these search results; and use the “Add to Production” options to add your past candidates to your newest casting notices, so you can consider them for casting in your current productions as well.

Bulk Actions

You can select multiple candidates in either the grid view or list view by selecting the checkbox next to their profile:

21 (2)

You can also use the “Select All” checkbox to select all applicants on a particular page.

Click the “Actions” button to view a drop-down menu showing your available actions. You can then select a bulk action that will affect all selected applicants:

2023-07-13 13_06_13-Talent Database_ Find Local Actors for Hire _ Backstage

You can now Tag all of your selected candidates or add them to any Production and Role you’re casting on the platform.

When you add a candidate to a Production/Role on the site, then you can manage the candidate within your project’s Application Manager.

To access the Application Manager for each of your productions, first visit your Casting Dashboard, where you’ll find a list of your projects. Then click the “Go to Application Manager” option next to the project of your choice.

Your Application Manager organizes all of your projects applicants for you by the roles they applied for (and by the roles you decided they might be right for). When you add a candidate from the Talent Database to your production, they’ll appear alongside the actors that applied to your project’s roles. To distinguish between actual applicants vs. talent that you discovered in the database, the applicants you added to your production are automatically marked with a “Suggested” label. You can also filter through your Application Manager to just see Suggested talent, or just view applicants, or view a mix of Suggested talent and applicants.

Additionally, the Suggestions tab in your Application Manager will automatically search through the Talent Database for you, based on your role criteria. And you can add candidate’s from the Suggestions tab back to your production/roles as well.

One of the great benefits of our casting system is this full integration between your Dashboard, Application Manager, and the Talent Database — with your work in the Application Manager automatically populating folders in your Talent Database; and options in the Talent Database populating Suggestions in your productions’ Application Manager; and the ability to move candidates from the Talent Database back to your productions; view all of the applicants from your current and past productions grouped together in the Talent Database; quickly invite the actors you discover in the Talent Database to apply to your casting calls; and so on.

You now have more than 100,000 actors, models, and performers at your fingertips, all integrated into the most powerful casting system in the world, with tagging and organizational options customized to fit your needs.

Gender

The talent on our platform can identify their gender(s) on their profiles by selecting from a wide variety of gender options, as well as having the option to enter their own custom text. They can also choose to leave their gender unspecified, if desired.

Casting directors and talent seekers can then filter through the Talent Database and their Application Manager without selecting any gender options (so they can see all talent by default), or by choosing specific gender options as search filters. Choosing specific gender options will narrow your search results to show matching talent.

The gender-based search options can also be used in combination with other filters (such as location, union status, age-range, etc.) to generate even more customized search results.

Likewise, casting directors can tag the roles in their character breakdowns with any combination of gender options (or leave a role gender-neutral by simply not selecting any gender options at all) to indicate the gender(s) envisioned for that role. Job posters can also draw additional attention to the openness of a role by selecting the specific "All Genders" option.

And actors can then search through the roles based on their gender preferences. Roles that are not tagged with a gender or that are tagged with the "All Genders" option will appear in all search results, regardless of the specific gender-filters used by the talent when they're searching for roles.

Note: Any gender, ethnicity, age-ranges, or other traits and characteristics noted in a role description should only be an indication of how the role/character is described, and should not be treated as a strict requirement about who can and cannot apply or be considered. We allow anyone to apply to any role at their own discretion, and encourages unbiased consideration of all applicants. Discriminatory practices are not allowed.

Click here for more details about how to choose genders for a role in job posting.

Or click here for more info on how to choose genders on a talent profile.

Invitations

Start Your Search 

When you post a job on the platform, you'll quickly receive relevant submissions. But you can also use our Talent Database's advanced filters to find additional candidates.

Then use the "Add to Production" or "Tags" option to keep a candidate in mind without notifying them yet. You can always send them an invitation later, when you're ready.

View Suggestions

Using your production's Application Manager, choose one of your roles, and the Suggestions tab will appear. This view will automatically show you talent that haven't applied yet that match some of your key role criteria. You can then apply additional filters to further narrow down you search.

Send Invitations

Now that you've proactively found actors, performers, and/or voiceover artists that you like, you can easily send them a formal invitation to apply to your project.

Simply click the "Invite" option. They'll immediately receive an alert (and an email) encouraging them to apply, with a link to your casting call automatically included. 

2023-07-13 13_12_38-Talent Database_ Find Local Actors for Hire _ Backstage

You can also click on the "Invite" button on the bottom of any applicant card:

22-2


There is also a way to invite outside talent to apply to a role that you have posted from within your Application Manager. For information about that, please click here.

Post a Casting Call

Click the "Post a Job" button on any page on the site to create a job listing or casting call

Your listing can include a plot synopsis, a full breakdown of the characters you're casting for, media assets (such as script sides, your company logo, promotional posters, your directing reel, etc.), links, audition details, and other key project details. You can post a listing with us to call for cast and crew for your productions. Look for new talent to represent. Hire actors, writers, staff, and interns. Find collaborators and volunteers. And more!

Your casting notice will instantly reach our wide audience of actors, models, performers, and crew -- while being targeted specifically to your production's locations and needs.

Posting a listing also unlocks the other features described in this FAQ, such as the Casting Dashboard, Application Manager, Invitations, Collaboration, and Talent Suggestions.

Posting Guide

Key aspects of the casting call posting process include:


  1. PROJECT DETAILS: Note the type of talent being sought, your project's title, production type, description, location, and contract details. Add your company's name and relevant staff list.

  2. DATES & LOCATIONS: Set the listing's expiration date. Add Key Dates & Locations for the production. Enter the cities and states you're looking for applicants from or call for submissions nationwide or worldwide. 

    Click on the "Add Audition Details" option next to any location to announce specific audition dates and locations (including open calls or by-appointment calls), and we will automatically generate map and calendar links for your listing, and your casting call will be included in additional audition-based search results.

    Choose whether you would like to request pre-screens from applicants. If "Yes" is selected, you will be advised that pre-screens are added when creating roles.

    Use the "Special Submission or Audition Instructions" box to list alternate submission methods (such as snail mail); link to your company's website; and describe your project's submission requirements or provide audition instructions.

  3. ADDITIONAL MATERIALS: Make your listing stand out by attaching media assets (script sides, a company logo, video reels, audio clips, etc.).

  4. ADD ROLES: Click Add a Role for each position you're hiring for. Then enter a Role Name. This can be a specific character name like "Peter Venkman," or a general term like Actors, Singers, Dancers, Interns, Writer, etc. Select a Role Type. Use the gender, age, and ethnicity options to correctly tag the role for enhanced discoverability. Add requested Skills if desired. Set up your Pre-Screen Request if you have decided to ask for that. And then fill in the Role Description to describe the character you're casting or job you're hiring for.

    You can also set Media required from applicants to limit your response to only applicants that have photos, video, or audio assets on their profiles; this will dramatically limit the response, so we recommend starting out by only choosing Photos (you'll still get to see video and audio reels anyway, when the talent has those assets available). We automatically set the most popular options for you as defaults!

  5. SUBMISSION SETTINGS: Note whether you are accepting submissions through the website. Only include your email address in the "Email Address" box and choose a notification frequency: Your email address will be hidden to protect you from spammers, but you can still choose to have submissions securely emailed to you via our platform as either individual applications or convenient digests.

  6. CHECKOUT: Preview your job post. Then review the pricing and enhance your post with additional options, such as Extra Categories. Enter your discount code in the Promo Code box.

  7. CONFIRMATION: The confirmation screen will let you know that your listing is now live on the site, while providing you with convenient options for viewing and managing your casting notice; sharing your post with your social networks; and more.

  8. MANAGE YOUR SUBMISSIONS: All applications will be automatically organized for you, grouped by Production and Role Name, so you can easily focus on reviewing submissions for each individual role. You can then quickly filter out irrelevant submissions; group together the applicants you like; designate who you're going to audition or cast; change role assignments; and easily respond to applicants individually or in bulk. Click here for more tips and tricks.

For an in depth look at how to post a notice, please see this help center article.

Tips for Adding Roles to a Listing

The following guide will help you learn how to quickly and effectively add Roles to your listings.

    1. When you're posting a job or casting call, you can add one or more Roles.

      2021-07-27 20_21_07-Post a Job Wizard


      2023-07-13 14_18_32-Post a Job Wizard
    2. The first field is the Role Name. This can be the name of a Specific Character (e.g., "Romeo"), or the Job Title of the position (e.g., "Dancer" or "Stage Manager").

    3. You'll get the best results if you take the time to enter Individual Roles (add a specific Role for each character or job position). This also activates automatic role-based labels on submissions, as well as easier sorting of applicants.

    4. However, if you're in a hurry, you can very quickly just enter a general catch-all Role Name (e.g., "Actors" or "All Roles" or "Crew") instead of individual roles.

    5. After typing in a Role Name, you can define the Role by choosing a Role Type (e.g., Lead, Supporting, or Extra). Choose "N/A" if none of the Role Types are right for you.

    6. Then you can choose the gender, age-range, ethnicity, and skills of the role(s). Some good defaults are chosen for you automatically, but you can easily adjust the settings to fit your needs.

      2021-07-27 20_29_31-Post a Job Wizard


    7. If you don't want to display an upper age-limit, then simply leave the Maximum Age at 100. Any ages above 99 will display as a simple "+" on your published listing (e.g., "ages 18+").

    8. Clicking on "Add a Pre-Screen" allows you to request a video or audio pre-screen from applicants performing/reading sides you may provide. Please see this article for more information about Pre-Screens.

    9. The "Media required from applicants" options allow you to limit submissions to just applicants that have Photos, Video Reels, Audio Reels, and/or Cover Letters available. We recommend starting out by only requiring a Photo and Cover Letter, so you'll have a lot of candidates to choose from. However, if you're getting too many unqualified applicants, then you can limit the submissions later by adding Video and Audio requirements.

      2021-07-27 20_35_47-Post a Job Wizard

    10. In the Role Description box, you can fill in a full character description or job requirements. You can also note whether or not the role requires nudity.
    11. You can also always add more roles to your casting notices later. Simply visit your Casting Dashboard, click the edit icon or "Manage Applicants" next to the production you'd like to update, and then choose the "Add a Role" option.

      30

On these pages you can also edit and update your existing roles; or "close" roles to remove them from your casting notice to prevent additional actors from applying to the roles; re-open roles if you want to start receiving submissions to them again later; or permanently delete roles if no one has applied.

Closing a role prevents further applications to just that specific role, while allowing you to continue to have access to all of the role's applicants in your Application Manager. To stop submissions to all roles at once, simply expire your casting call; you can always extend the expiration date again later if more applications are needed.

Location Settings

The platform's "In-State Submissions" filtering option makes casting in your local area easier than ever.

Here are six tips for casting locally, nationwide, or worldwide:


  1. When posting a listing with us, you can choose any combination of cities, states, and zip codes where you'd like to receive submissions from. The locations you choose will ensure your casting call is seen by talent located in your preferred areas.
    2023-07-13 14_29_46-Post a Job Wizard
  2. Some talent from other areas might also apply for your project, if they're willing to travel or weren't paying attention to your location preferences. However, you can now have all out-of-state applicants automatically pre-filtered and removed from your notification emails, so your email doesn't get cluttered with applicants from incorrect areas.

    Simply choose the "Only send notifications for local and in-state submissions" option and you'll only receive submission emails from talent located in the states/territories you specified.

  3. Or, if you're looking for submissions from everywhere, you can skip the location options and instead just click the nationwide or worldwide options.

  4. Enter your email address in the "Send submissions to this email address" field and your email will be completely protected from actors contacting you directly, spammers, or other sites misappropriating your contact details. Your email will only become visible to the talent you choose to give your email address to.

  5. You can also choose to receive new submissions as individual emails or conveniently grouped together into single daily or weekly digests.

    2021-07-27 20_47_53-Post a Job Wizard

  6. All of the applications submitted to your project are also always available in your Casting Dashboard & Application Manager, where you can quickly view, organize, and respond to applicants. Your Application Manager also includes more advanced options for filtering through talent by age-range, gender, ethnicity, union status, media assets, keywords, and even specific geographic radiuses around any location.

Popular Posting Upgrades

You can post listings on our platform to find actors, singers, dancers, models, musicians, comedians, stunt performers, cabaret acts, mimes, clowns, variety performers, voiceover artists, triple-threats, students, teachers, staff, crew, volunteers, interns, and so much more. Even a basic posting will reach thousands of potential candidates. But if you'd like to stand out from the pack, the following paid add-ons will help you upgrade and enhance your listing:


    1. Featured Listing: This deluxe VIP option ensures that your posting is marked as a featured item in search results, while also bringing your listing ongoing exposure as it'll be automatically highlighted in the Featured Casting sidebar module, in rotation with other featured listings, thousands of times across various pages of the site for the entire length of the listing's run.

    2. Print Spotlight: Your listing will be included in our popular print-publication and digital-edition magazines and also appear as a special spotlight item in online search results. 

    3. Extra Categories: You can choose a primary "production type" category as the first step when creating a job posting. Then, during the checkout process you can choose up to two additional categories, doubling or tripling the number of search results your listing appears in.

      Example: If you're seeking cast and crew for a movie that involves some dance scenes, choose Feature Films as your primary casting category, and then choose Dancers & Choreographers and Film & TV Crew as your secondary categories.
        
    4. Boosted Listing: After your listing has been running for 3+ days, you can choose the Boost option to temporarily promote your casting notice back to the top of the search results, as if it were a brand-new listing — attracting a whole new round of applicants.

Additionally, you can add Media Assets to your listings for free: 

Easily embed YouTube and Vimeo videos in your profile and casting calls — showcasing your demo reel, past works, or a trailer or pitch video explaining your current project. And quickly attach script sides, story treatments, full screenplays, extended character breakdowns, photo references, promotional flyers, audio clips, your company logo, and more. Upgraded and media-enhanced listings often attract the best talent!

Manage Your Listings

Visit your Casting Dashboard and click the "Edit" option next to any of your projects to quickly update any of your listing's details, add more roles, adjust the expiration date, and more.

Popular options include:

    1. If you started posting a listing but didn't complete the post, don't worry — we've automatically saved your info for you as a Draft, so you can pick up right where you left off.

    2. If you successfully posted a casting notice but it's expired, you can extend the listing for free by editing the expiration date of your Expired Calls — and start receiving more submissions from applicants. (Or if you've completed casting early, you can expire the listing early as well, to prevent more actors from applying.)

    3. Old casting notices may receive a very limited response. To get more submissions, click the "Edit" option next to any of your past or current postings, and then choose the "Boost Your Listing" option to send your casting notice back to the top of the search results, attracting a whole new round of applicants.

    4. In the Job Editor you can also click the "Clone" option to make a copy of an old listing, easily update the details, and then post it as a new item. (This option is handy if you want to start fresh with a new pool of applicants; otherwise, the Boost option is usually preferable).

Next Steps

Founded in 1960, Backstage is the world’s most trusted casting resource. Backstage publishes a weekly print-edition magazine, and Backstage.com reaches over 2 million actors, performers, theater-enthusiasts, and film-lovers across the world. We have published casting notices for every Broadway production for over 60 years, and hundreds of thousands of major and indie productions spanning films, plays, musicals, commercials, web series, and more — as well as helping to launch the careers of amazing actors like Robert De Niro.

Thousands of industry professionals are currently casting with us, taking advantage of our latest online tools. With the inclusion of your casting notice on our stie, your company and projects are set to achieve new levels of positive publicity while attracting the greatest talent.

After posting a listing, you'll receive a few emails from us with more details:

  1. If you didn't already have an account, you'll receive a welcome email notifying you of your new free account, with a convenient overview of our casting tools.

  2. A posting-confirmation email letting you know that your casting notice has been posted, with links that will let you view and control the listing.

  3. Our editors will then review your casting notice for accuracy, grammar, formatting, and relevancy. We may contact you if additional info is needed. Once your listing is edited and approved, you'll receive a final confirmation email.

  4. If you're accepting applications via email, you'll receive a streamlined Daily Digest email (or whatever email-notification frequency you've selected) containing the photos and submission details for any users that apply to your project.

    (To eliminate spam, your email address will not be revealed to anyone, unless you've added your email address to a visible text field. Our application and messaging systems route emails to you privately, so you can control who you'd like to communicate with. The submission-notification emails will also stop automatically when your casting is complete, based on the adjustable expiration date set for your listing. And if you're not accepting submissions, then actors will not be able to submit their materials to you electronically, and will only be shown the audition/submission instructions that you've chosen to reveal.)

Key benefits of your free account include:

  • Reduce email clutter: By default, all new submissions are combined into a single daily overview email, so you can cast at a glance. You can also change your application-notification options at any time to alter the email frequency to fit your needs.

  • Quickly filter through applicants based on location, gender, age-range, role, union status, and more. Our casting system will save you hours of time.

  • Tag your favorite actors, remove irrelevant submissions, and bulk-contact applicants.

  • Search through over 150,000 additional media-enhanced resumes in the Talent Database.

  • Easily update the production details, role descriptions, audition info, and expiration dates for your listings.

  • Add script sides, images, and video clips to your posts.


Please let us know what additional improvements you'd like to see on the platform that would help improve your casting process: We're constantly enhancing our website to fit the needs of entertainment professionals such as yourself, and we value your feedback.

Click here to visit your Casting Dashboard and easily manage your casting calls, talent applications, collaborators, and communications.

Or visit Backstage.com/Cast-Your-Project to post a new casting call.